Thursday, December 29, 2016

Beauty Biokor-S 4.5cm f1.9 In Use

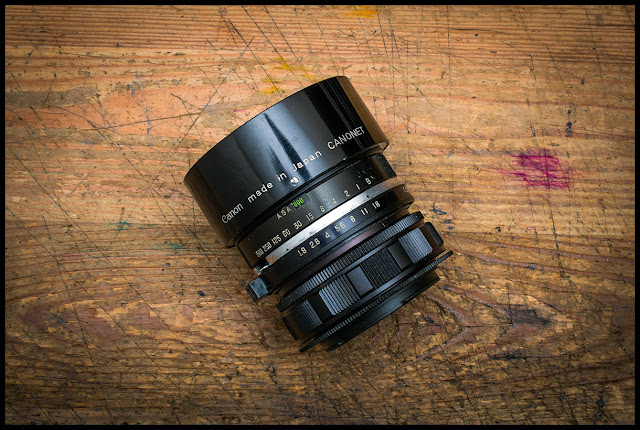
This lens turns out to be quite nice.  I mounted it on my A7 for about a week and shot a few hundred frames. I enjoyed it as a walk-around lens.  The Pentax helicoid provided a very versatile focus option from extreme closeup to infinity, all without having to add extension tubes.  The funky looking honey-combed defuser panel for the light meter cell adds a touch of vintage charm.  The only negative is the sticky aperture ring, and I did have to use it a few times for some pictures with a bit more depth of field.  Not a big deal, but an annoyance just the same.

I like the smooth bokeh from this lens.  Some very slight swirl when pictures are taken at certain distance, but overall very pleasing.  It flares quite easily, like most old lenses.  A hood helps a bit but not at all situations.  Overall, I think it was worth the effort of the conversion.  This lens produces nice results.

Reflection - Biokor-S 4.5cm f1.9 @ f1.9 & Sony A7


Slightly Swirly Background - Biokor-S 4.5cm f1.9 @ f1.9 & Sony A7


Nice Smooth Bokeh - Biokor-S 4.5cm f1.9 & Sony A7

Flare - Biokor-S 4.5cm f1.9 & Sony A7

Sunday, December 25, 2016

Merry Christmas!

I want to wish my readers a very Merry Christmas!  Hope you have been good all year and Santa has brought you shiny new toys, hopefully with multi-coating :)

Have fun with family and friends and be safe!

Wednesday, December 21, 2016

Ross London Xpres 105mm f3.8 from Ensign Selfix 820

I have heard/read about Ensign cameras, and how much the owners praise them, and how much would-be owners curse them for their relatively high price compared to others.  For me, I don't particularly care about the Ensign cameras, since I don't really shoot film, especially medium/large format film, but I have always been a big fan of Ross London lenses.  I have a couple of Xpres Wide Angle 5 inch f4 large format lens which I absolutely love; its lovely and unique bokeh and rendering sometimes leave me weak on my knees :)

Ross London Xpress 105mm f3.8

The Xpres 105mm f3.8 is another lens I have been eyeing for a while, but Ensign cameras are not common in Canada, at least I don't see it often in the used market/camera shows.  But, one finally showed up at a reasonable price, so I grabbed it, along with another folder camera sporting a Schneider-Kreuznach 75mm f3.5 Radionar (Triplet) lens, which we will talk about in another post.  The Ensign is in reasonably good condition, but as with most very old folder cameras, there always seem to be some problems, usually with a worn bellows, or slow/jammed shutter, as the case with this Ensign.  The camera is an impressively built beast.  Hefty and solid, that almost gives you an urge to pound nails with it :)

Xpres 105mm f3.5 and the Ensign Selfix 820

The camera/lens is obviously well used.  The previous owner(s) probably used it until it no longer works, as in its present condition.  I like well used camera/lenses; one must love the camera enough to have used it again and again.

The lens is easy to remove since it is held in place with only a retention ring. Despite the age, the optic is near perfect, except the rear element has a few scratches.  No haze that I could see, and the lens is coated, though probably not multi-coated.  One word of caution when setting the lens down, the rear element is not guarded and the glass will touch the surface.  Perhaps that's how the scratches on the rear elements came about.  So, put it down on the front, not the rear, if you don't want the rear elements scratched.

So far, I have not mounted the lens on the camera yet, but I am uber anxious to try it. The flange is long enough to be used on my Nikon D810, so perhaps I will be using it on the Nikon as well as the A7.

Stay tuned for further development :)

Sunday, December 18, 2016

The Beauty Biokor-S 45mm f1.9 Conversion

This is an interesting camera.  I never knew this brand even existed until I got this camera.  Some Googling reveals there are some fanatic followers for some of its rangefinder camera.  The one I have, unfortunately (or fortunately), has damages, and was dead.  I don't have to feel bad gutting it for the lens to transplant it for use on digital.

A Beauty, no?

I originally wanted to preserve the built-in focus mechanism, but the lens has some strange designs that prevents this from happening.  On most rangefinders, there are two focus guides; one on each side of the lens and are small and very close to the helicoid.  On this lens, there is a single focus guide and is placed quite a distance away from the helicoid.  If I were to retain the original focusing, I would have to machine the mount much larger than the diameter of the lens to accommodate the focus guide.  If I were more skilled, I could probably create my own focus guide, but I am not there yet.  In the end, the built-in focus is abandoned, and the Pentax 17-33mm focus helicoid is used.  There are many advantages of using a helicoid with 16mm of focus travel, and one of which is extreme close focus while still retaining infinity focus.  Another advantage is the focus feel.  The Pentax helicoid is smooth as silk and what a pleasure to use.

The skin on the front of the camera need to be removed, which will expose the screws that secure the lens module.  The top plate probably does not need to be removed, but I did it anyway.

Once the screws were removed, the lens module can be pulled out easily.  Note the focus guide circled in red.  

I need to use an M42 mount for the lens, so that it could be screwed on to the Pentax helicoid. This M42 mount came from one of the three sections of a Pentax extension tube.  I have to somehow mount this onto the lens.  The obvious way to do it is to attach it to the inner helicoid.  The only problem is there is less than 3mm of space available between the lens and the focus helicoid.  I machined the inner helicoid tube from its original 25mm to about 1mm thick, and the M42 mount to about 3mm, just thin enough to achieve infinity focus.  I then epoxied the two parts together.  Since the weight of the whole lens is held together by the glue, I am not too comfortable trusting glue to handle this by itself, so I intend to drill/tap and screwed them together for some added assurance.

Remove everything at the rear of the lens, but keep the retention plate.  This plate is used to hold the M42 mount to the lens.  See next picture for the plate. The screw circled is a key that makes sure the plate does not move around.

On the left is the M42 mount I cut from the Pentax extension tube and machined to the required thickness.  In the middle is the retention plate that I machined so that it will fit inside the back of the M42 mount.  These two pieces are glued together with metallic epoxy. 

The retention plate is glued onto the M42 mount. Note the recessed groove; it's just small enough that the retention ring can't go through the hole.  This is where the retention ring on the right will be pressing on while screwed onto the lens.  This secures the mount on the lens.

All the pieces fitted together.  The notches circled in red is where you use the spanner wrench to tighten the retention ring and secure the mount.

Disabling the shutter

This is actually the trickiest part that took more time.  It involves disassembling the front of the lens.

Remove the retention ring with a spanner wrench and remove the diffuser piece. Next unscrew the front element group, and take out 3 pieces under it. Now remove the 3 screws circled in red.

Once the 3 screws are removed, lift this piece out, and the piece below it.  This will expose 4 more screws that need to be removed.  Note the small retention ring in the middle, pointed to by the blue arrow.  This one also needs to come out.

Take out the piece secured by the 4 screws, and now the inner retention can be removed.  Note the locking screws in red.  It needs to be turned so that it's not touching the retention ring.  Using a pointed spanner wrench, remove the retention ring.

Once the retention ring is removed, take it out, as well as the two other pieces under it. This is the end of the disasembly.

This is where you will find the shutter cocking mechanism, circled in red.  Find the part that actually engages/disengages the shutter, and glue/solder it in place.  For this particular lens, I just removed the shutter blades using a long nose plier since I didn't feel like I wanted to go through all the disassembly steps, but I did the steps here to show where you can do it without removing the blades.

Everything together.  Looks nice with the Canonet hood :)

A real beauty, ain't she?

One issue that this lens has, is the very stiff aperture ring.  I think there are two much gunk that gums it up.  But, I am not going to do further disassembly to fix it since I hardly use the aperture :)  I shoot mostly wide open.

Next time, we will look at some pictures taken with this lens, and see if Beauty is only skin deep, or it actually has substance.

Saturday, December 17, 2016

Soligor 55mm f1.8 Miranda Screw Mount

Soligor and Vivitar lenses were all that I could afford when I started in photography.  I bought a brand new dual focal (85mm & 135mm) Soligor in the mid 80s for my Pentax Program Plus.  Never liked it, and the whereabouts of this lens is now a mystery.  But that marked the first time I encounter Soligor lenses, and only knew it as cheap alternatives to the more expensive OEM lenses.  Still have a few Soligor lenses.  Early ones were actually quite well made, and all were made in Japan, many of them by Tokina.

Soligor 55mm f1.8 in Miranda Screw Mount

At the last camera show, I was surprised to discover a normal, 55mm Soligor lens, which I never even knew they existed. Even more surprised it was a screw mount that fit the hybrid mount of the Miranda cameras.  Yes, some of the Miranda camera can accept screw mount and bayonet mount lenses.  Unfortunately, the screw mount is not the standard M42 but is slightly larger, around 50mm but has the same 1 mm pitch as M42.  Some companies, like Tamron, never made a normal (50mm/55mm/58mm) lens that I know of, and this Soligor 55mm f1.8 is the only Soligor normal lens I have ever seen.  Since it was pretty cheap, I bought it to check it out.

Old St. Lawrence Market, before it was completely demolished. Soligor 55mm f1.8 & Sony A7

The lens is very well made like most lenses at the time.  It's also a pretty large lens.  All metal lens barrel and mount with 10(12?) aperture blades, but they are not really round in middle apertures, but are sawtooth-like, similar to many older cine lenses.  This lens has pre-set aperture, so there is no automation at all between camera and the lens.  There is no coating on the glass surfaces, therefore the lens has lots of reflection on the front of the glass.  A proper hood really should be used when shooting outdoors.

In order to make the lens mountable on my A7, I had to machine a used M42 mount that goes over the existing screw mount.  This way I can screw the lens on the M42 focus helicoid.  This works out really well.


Bokeh Samples - Soligor 55mm f1.8 & Sony A7

The image quality is pretty much what I expected, similar to other 55mm f1.8 lenses I have used.  The lens is not super sharp at wide apertures, but it does produce pleasing bokeh.  Even stopped down, the lens lacks microcontrast the give "bite" to pictures, but with a bit of unsharp mask, the files are more than usable.

Overall, it's an interesting lens, not optically, but from the uncommon stand point.

Gooderham Flatiron Toronto - Soligor 55mm f1.8 & Sony A7

Wednesday, December 14, 2016

The Worrying Trend of Increasingly Higher Priced Sony Cameras

We see Sony announced the A6500, a camera with features that all A6300 owner wanted in their camera in the first place.  It's almost predictable that the newer models is hundreds of dollars more than the one it replaces.  In the case of the A6500, it's around $400CAD more than the A6300.  The marketing geniuses at Sony does not actually "replace" the current model, but sells them side by side.  The older models become lower spec'ed cameras and the new model becomes the top of the line model with the top of the line price, but that does not take away the fact that it's still a replacement until they sell off the current inventory of older models.  Sure, the A6500 checks all the boxes in the bells and whistles department, but it actually costs $200 more than then full frame Sony A7, and is very closely priced to the Sony A7II.

The prices of new lenses and camera bodies steadily increase with each new announcement, and not just incremental increases either.  For Sony, they seem to want to play the up market game, and price their new products accordingly.  Yes, we know the Sony cameras are increasingly more capable than those models before, and have features that many other camera makers don't have, but how far can they go before they end up being a niche player like Leica?  It won't be long if each new model is $400-$500 more, and in the case of the A7R II, the price is mindblowing $4000 in Canada.

Yes I am whining because I don't have the deep pocket of those who have a lot of disposable income.  I would love to upgrade my A7, but not at these rediculuos new prices.  If a crop sensor A6500 costs close to $1800, I can't imagine how much the A7 III will cost.  My guess would be around $3000.  I upgraded from NEX-5 --> NEX-5N --> NEX-6 --> A7 because each model didn't cost significantly more than the one before, except the A7 but it was in a different product category.

I guess I will continue to enjoy my trusty A7, but one day it will die, and I will likely replace it with something affordble, like a used A7 or A7 II.  I would rather spent the money on lenses, as the A7/A7II are still very capable cameras.

Hooked - Yashinon 4.5cm f1.8 from Lynx-1000 Rangefinder on Sony A7

Tuesday, December 13, 2016

Wollensak Velostigmat 85mm f3.5 from Ciro-Flex TLR

I picked up this Ciro-Flex TLR at an antique shop a while ago.  This American made 6x6 TLR was cruelly put together, but was built like a tank; very American like.  But there are parts missing; for one thing, the focus mechanism is not working, and the viewfinder is stuck.  I have little interest in TLRs other than the lens that's attached to it, and in this case, the Wollensak 85mm f3.5, which looks really nice, and I like Wollensak lenses.

Ciro-flex with Wollensak 85mm f3.5 lens.

The lens was attached to the camera by a retention ring inside the film chamber.  It was really recessed and non of my spanner wrenches is long enough to reach the ring.  I ended up cutting up a piece of steel cabinet scraper plate, just small enough to get to the retention ring.  It all worked out really well.  These cabinet scrapers were bought at a garage sale and I had the intention to make custom spanner wrenches with them, since many times a standard span wrench could not be used due to space constrains, or length or both.  If I do get around making them into custom spanner wrenches, I will have a write up on it.

The removed lens was put on the converted Vivitar focus helicoid with a couple of filter rings, and I took it out for some test shots.

Mystique bokeh - Wollensak 85mm f3.5 & Sony A7

It turns out images are quite interesting, but I immediately noticed the flare in pretty much all images, even though I had a hood, but obviously not long enough.  Still, I am quite happy with few of the pictures.  The bokeh is quite nice, and of course it looks different depending on how close the lens is from the subject.  Most of the bokeh shots turned out very smooth, which should be good for portrait.

Rust - Wollensak 85mm f3.5 & Sony A7

The lens is relatively sharp, at least at the center, but the edge is only passable even at smaller apertures at infinity.  Perhaps the lens was not mounted properly, or this particular copy isn't the best.  Still, I like how the lens renders the pictures.  It has a nice personality.

Anchor - Wollensak 85mm f3.5 & Sony A7

Perhaps I should machine a more precise adapter to fit this lens on the helicoid and see if it performs better.  I have only used the lens a couple of times, so it's still very early to form conclusions.  But, so far, I like it on the Sony A7.

Wednesday, December 7, 2016

Minolta Chyoko 4.5cm f3.5 Rangefinder Lens Conversion Part II

This little lens is a pure joy to use.  The lens barrel is made of brass, so it's very dense and focuses like silk, after I re-lubed the helicoid.  This is one of the things you can not get from modern lenses, aside from Leica and few other exotic and expensive lenses that come out of Germany.  It does not contribute to the quality of images, but it sure makes creating images more pleasurable.

Obviously, a lens with an f3.5 maximum aperture is not a great low light shooter, but it has other desirable attributes that shine over the short comings of the slow-ish maximum aperture.  Bokeh is one of its strong suits, and I adore it.  It has not the smoothest bokeh in all situations, but it's distinctively enjoyable. With highlights, you can see a strong outline on the rings, which to some, is not a good attribute of smooth bokeh, but I like it.  Reminds of the same kind of effects from a Trioplan/Triplet lens.  It's visually bold, as compared to bokeh from a Planar or Sonnar. Your mileage may vary, of course.  You may hate it, or like me, you may like it a lot.

Most very old lenses aren't great when it comes to sharp corners at wide apertures, and this is one of these lenses.  It's by no means very bad, but stopped down to around f11-f16, it's quite respectable.  It won't win any sharpness contests, but definitely usable, especially with a bit of sharpening applied.

The 5-blade aperture gives a more star-like shape when stopping down than other lenses with vanilla 5-blade apertures; the blades are shaped differently, giving the shape a bit more pleasant appeal visually , to me at least.

So, if you overlook the slow maximum aperture, this is actually quite an enjoyable lens to use, and it makes images with nice bokeh.

All images below were taken with the Minolta Chyoko 4.5cm f3.5 & Sony A7:


Sunday, December 4, 2016

Minolta Chyoko 4.5cm f3.5 Rangefinder Lens Conversion Part I

I know a lot of people just could not understand why anyone would even bother with a standard lens having an f3.5 maximum aperture.  Today's modern 50mm lens of f1.8 is considered slow.  So yes, why bother?

All I can say is that each lens has its place, and justification for its existence.  f3.5 is slow for low light photography, but there are many places where it can still make wonderful photographs, and you often find the photos they render is not reproducible by modern lenses.  The Minolta Chyoko 4.5cm f3.5 is one slow lens that I really, really like.

Minolta "A" in its original form.  Note the round design.  Very hard to hold and use.

This lens came from the Minolta "A" rangefinder, introduced in 1955 as an entry level rangefinder.  I have never held a more un-ergonomical camera than this one.  I think the design is terrible.  The camera feels like a melon in my hands, but we are only interested in the lens, so it's ergonomics is inconsequential. The lens came out quite easily from the camera with just a few screws from the front of the camera.

Lens is very easy to remove.  in fact, the lens can be removed without touching much of the camera body.

Lens as it came out of the camera.  Note the shutter mechanism at the rear of the lens.  Since we don't need it, it can be easily removed, and the best part of this, is that you don't have to worry about keeping the shutter open like most rangefinders with shutter assembly built into the lens.

The focus mechanism of this lens had very little damping so I decided to disassemble the lens to clean it and re-lube it. To do that, the front group of elements need to be unscrewed, but do be careful when removing it; this lens group is used to secure the aperture mechanism.  I made a mistake of tilting the lens while removing the lens group and the aperture assembly came out of its place.  Took me a long time to put the blades back.

Front lens group removed.  Note the aperture blades are just sitting there without anything else to second it in place.  The lens group is the only thing keeps it secured.  Don't tilt the lens while removing the lens group, otherwise prepare to spend a lot of time trying to put them back.

All the parts of the lens disassembled.  It's quite easy and simple.  Just remove all screws, but don't lose any screws and remember the sequence.

The disassembly of the lens is quite easy by removing the screws.  Be sure to note where the specific screws go and don't lose any.  The only tricky part, is putting the helicoid back.  You DO need to put the parts back at the specific location or the distance scale will not line up.  I usually mark where the parts separate, and this will help later.  Otherwise, you will have a lot of trial and errors and this is not a fun thing to do, believe me.

After the helicoid is taken apart, I used Ronsonol lighter fluid on a Q-Tip to clean off the old grease, and re-apply a light grease.  In a future post, I will talk about the different greases I tried and why I ended up with what I am using, which is Slickoleum Light Grease, that I also use for my bicycles chain and other parts.  This grease is light and provides the right amount of damping than the others I have tried.

Once the lens is cleaned and reassembled, the next part is the machine a spacer between the lens and the Pentax focus helicoid, which will act as part of the spacer between the lens and the Sony E-Mount.  With a lathe, this was very easy to do, especially when I decided to just glue the parts together, instead of drilling and tapping screw holds and use screws to hold them.

Simple parts required: on the left is a mount from an M42 2x teleconverter which I cut out.  Middle is the spacer I machined from aluminium.  The M42 mount will be glued to the top of this part. What's not shown is the rough marks I make on the surface to make the glue adhere better.  On the right, of course is the lens.

The other side of the parts. Note the screw holes on the lens.  If I wanted to, I can drill and tap the spacer and screw them together, but I find glue is strong enough.  I am still having trouble getting perfect alignment for screw holes.  I need a drill press, which I don't have, to do this properly. 

This lens has a rather long flange distance.  At first I thought it could be used on my Nikon D810, but no dice; it's still shorter than the very long F-Mount flange.  However, the distance allows the Pentax focus helicoid to be used as part of the space between the lens and the E-Mount, but just barely.

Minolta Chyoko 4.5cm f3.5 mounted on the Pentax Focus Helicoid and then on the Sony A7.  The lens itself has a focus mechanism, and can be used for medium to infinity focus.  For close up, I use the focus helicoid, or a combination of the two, for extremely close up.

In part II, we will take a look at what the lens can do.  You already had a peek from the picture in the last post, showing it's interesting bokeh.  We will explore more next time.

Wednesday, November 30, 2016

Blog Note

My apologies for the lack of posts lately.  It's not that I don't have anything to write.  In fact, I have written many articles but never published them.  I just find that my interest in the blog is weaning off.  Originally, I planned to do the blog for a year, or two years max, but did way more than that and it surprised me.  True, many of the posts have little or no substance but it was fun for me to write, and the blog kind of drove me to take more pictures and an excuse to acquire more gear :)

Another factor of the slowing down of my blog is the Flickr stream that I now maintain more actively.  It has taken up a lot of my time.  I often find that after processing my pictures, usually in the evening after work, and upload them to Flickr, I no longer feel like doing any more photography related activities for the rest of the evening.

Finally, the lathe project has taken up additional time, but I am very glad I got it.  So far, it has been extremely enjoyable and incredibly satisfying and rewarding.  What used to take me days to do with filter rings and other materials to make a lens work, I can now do it in a few hours, with more precision and better looking. I have learn so much, in a very short time, about lathes in general.  It's so true that reading about sometime and doing it are not the same.  Some things one must do it to learn, to acquire the skills, and to appreciate.  I have already found too many short comings of my micro lathe and started looking at larger lathes that allow me to cut threads, work on larger objects (not just for lenses), and be more efficient.

I do plan to update this blog more frequently, and probably more emphasis will be placed on lens conversion and using those lenses.  Also in the pipeline is doing some video of the lens conversions, but that will take even more time.  We will see what 2017 brings.

Berrilicious -- Minolta Chiyoko 4.5cm f3.5 from Minolta "A" Rangefinder & Sony A7

Monday, October 3, 2016

Rangefinder Lens Conversion - Some Experiments

So far I have done a few rangefinder lens conversions.  Some failures, some success.  On the whole, the later ones tend to be a bit better than early ones, so there is a slight improvement, which is encouraging.

From the very beginning, when I started doing rangefinder lens conversions, I like to preserve as much original parts of the lens as I could, especially the focus mechanism, but some lenses, because of the way they were designed, create a obstacles, and external focus helicoid must be used.  I like these lenses to have its original focus ring because they look aesthetically pleasing.  One of the issues with these lenses is their very long minimum focus distance, often at 0.8 to 1 meter, which makes close up pictures impossible.

The lens has been converted with an M42 mount.  When mated to the adapter on the left, infinity can be attained.  When mated to the adapter on the right, close focus is possible but no infinity focus.

As you can see, the two adapters have different thicknesses.  On the left, is about 3 mm thick for close focus, on the right is about 1 mm thick, for infinity focus.

Lens with normal adapter which will focus to infinity with minimum focus distance of about 1 meter.

In the past, the only way to get close up shots for non-lens-interchangeable rangefinders is to use close-up lenses.  This, however, changes the optical characteristics of the lens.  Since I am removing the lens from the camera, essentially making it an interchangeable lens, other close-up methods can be used, in this case, extension tubes.  So I have been experimenting with the idea of adding extension tubes.  Most commercial extension tubes have a minimum of 10mm, which is too thick for my taste.  I like to have some background characters in my pictures to show off the bokeh of the lens, so I don't really do super close-up, which usually renders the background to complete blur without any character.  This means I have to make my own extension tubes.

Sample close-up picture at about 0.5 meter.

For my latest conversion, a 4.5cm f2.8 lens from the Yashica J rangefinder, the lens has an M42 mount at the rear, which will screw onto a thin M42 to E-Mount adapter and will achieve infinity focus, but will have a long minimum focus distance of about a meter.  In order to get closer focus, I initially created a 5 mm extension tube, but found it to be too close so I created an adapter from an E-Mount reversing ring and an M42 ring, with a thickness of about 3 mm, which I find is a good balance between close focus and leaving enough background details.  This two adapter method is not as elegant or as practical as being able to focus from close up to infinity in a single lens, but I think it's a compromise I can live with.

I think this will be the direction I would like to take for new lens conversions.  We will see how it goes.

Empire Sandy - Yashinon 4.5cm f2.8 @f11 & Sony 7.